
How To Automate Patch Management for Servers
Patch management for servers is a critical task that ensures your systems stay secure and operational. Manual patching can leave your servers vulnerable for weeks, while automation reduces this gap to just a few days. Here’s how you can streamline the process:
- Inventory and Vulnerability Assessment: Use tools like Puppet, Chef, or Ansible to discover, catalog, and monitor servers. Link this inventory to vulnerability scanners for real-time patch prioritization.
- Policy Creation: Develop a clear patch management policy that defines responsibilities, patch categories, and timelines for updates (e.g., critical patches within 48 hours).
- Automation Tools: Select tools suited to your environment, such as WSUS for Windows, Ansible for cross-platform environments, or AWS Patch Manager for cloud setups.
- Testing Patches: Always test updates in isolated environments before deployment to avoid disruptions.
- Automated Deployment: Use staged rollouts, maintenance windows, and smart reboot strategies to deploy patches safely. Always have rollback plans ready.
- Continuous Monitoring: Track patch compliance, failure rates, and time-to-patch metrics. Generate reports for audits and performance reviews.
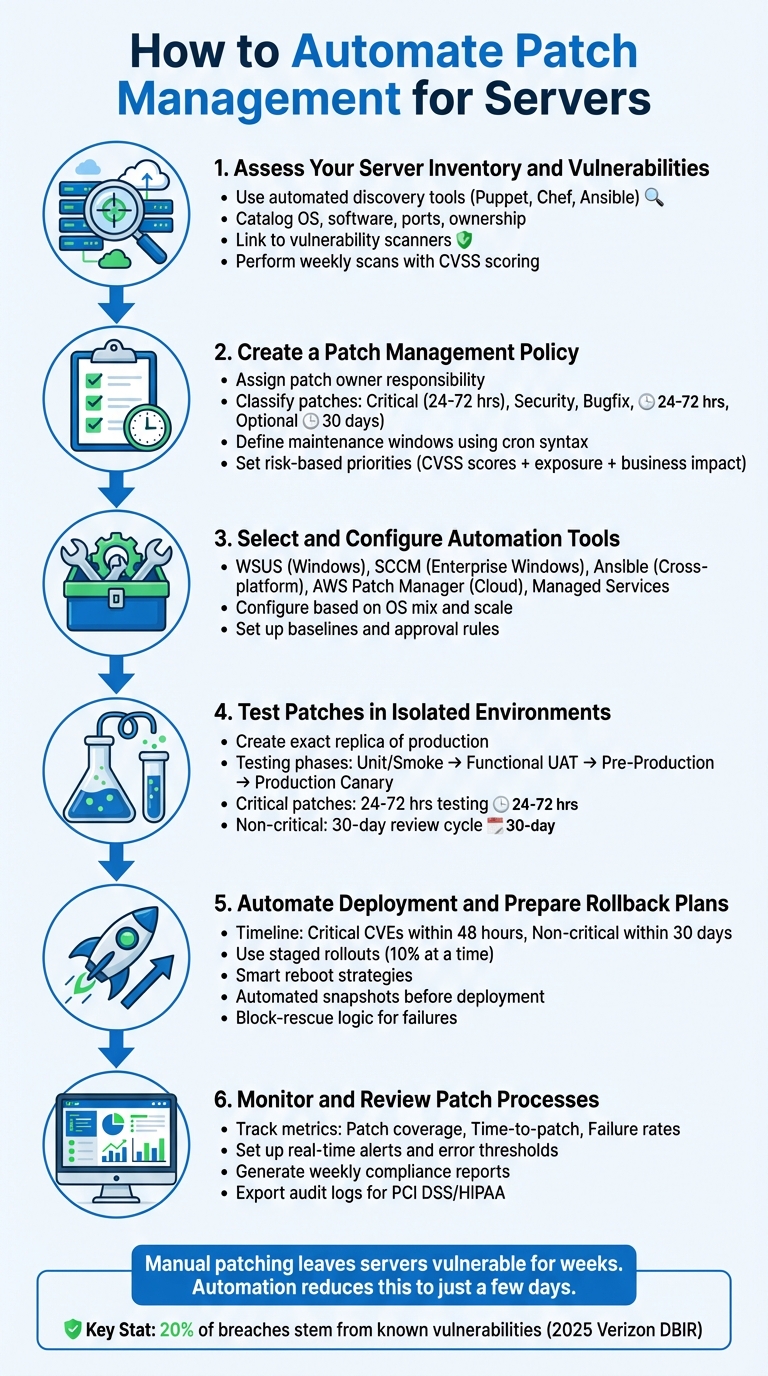
6-Step Server Patch Management Automation Process
Step 1: Assess Your Server Inventory and Vulnerabilities
Identify and Catalog Your Servers
Start by identifying all your servers using automated discovery tools. For detailed, continuous monitoring, agent-based tools like Puppet or Chef are excellent choices. If you want to minimize server overhead, consider agentless methods like SSH-based Ansible.
Once discovered, catalog each server by recording its OS, installed software, open ports, and ownership details. Utilize dynamic inventory plug-ins and tagging to classify servers by key factors such as operating system, environment, and maintenance schedules. This organization makes it easier to deploy targeted playbooks. If you’re using platforms like Serverion VPS or dedicated servers, make sure to integrate them into your centralized management system to avoid missing any assets.
"Server Patch Management begins with knowing what you have. A reliable asset inventory – including OS version, installed packages, open ports, and business owner – enables precise vulnerability matching." – Jack Williams, WordPress and Server Management Specialist, Moss.sh
Next, link your asset database to vulnerability scanners. This connection allows you to automatically generate a prioritized remediation list and monitor for "state drift", which helps identify servers that have fallen out of compliance. With a comprehensive inventory in place, you can move directly to scanning for vulnerabilities and prioritizing patches.
Perform Vulnerability Scanning
Once you’ve cataloged your servers, the next step is vulnerability scanning. Accurate inventory data makes this process smoother and more effective. Use tools like AWS Systems Manager Patch Manager, Tenable Nessus, or OS-native options such as yum-plugin-security for Red Hat/CentOS. These tools identify missing patches and assign severity levels based on CVSS scores.
To prioritize patching, focus on the business impact, exposure, and exploitability of vulnerabilities. High-severity or critical updates should be applied within 48 hours of release. For medium or low-severity issues, a timeline of up to 30 days is generally acceptable. For instance, a public-facing web server with a CVSS 8.8 remote code execution vulnerability requires immediate action, while an internal backup server with a low-severity issue can wait.
Schedule weekly scans and set up real-time alerts for critical vulnerabilities. Start with "Scan" operations to generate reports without disrupting production systems. Then, integrate your scanners with patch management tools to create a dynamic, automated workflow that aligns with your organization’s risk tolerance and compliance standards.
Patch Management with Ansible
Step 2: Create a Patch Management Policy
Once you’ve identified vulnerabilities, it’s time to formalize your approach with a well-structured patch management policy.
Start by defining your patch management policy. According to NIST SP 800-40 Rev. 4, patch management involves "identifying, prioritizing, acquiring, installing, and verifying the installation of patches, updates, and upgrades throughout an organization." Without a clear policy in place, even the best automation tools won’t provide the direction or accountability you need.
Assign Responsibility: Designate a patch owner to coordinate updates across teams. This person ensures that patches are applied on time and that all processes are followed.
Classify Patches: Break patches into categories like critical, security, bugfix, or optional. Assign tighter deadlines for critical updates (e.g., 24–72 hours) compared to non-critical ones, which can follow a more relaxed timeline, such as 30 days. For zero-day vulnerabilities, have an emergency response plan ready to act within 24 hours, bypassing normal approval processes where necessary.
Plan for Exceptions: Include rollback procedures and a formal exception process for systems that can’t be patched immediately, such as legacy systems. This ensures you maintain control even when immediate patching isn’t an option.
"Server Patch Management policies succeed when they’re clear, pragmatic, and aligned to business risk." – Jack Williams, WordPress and Server Management Specialist, Moss.sh
Communicate Clearly: Establish communication channels – email, status pages, or chat tools – for notifying stakeholders about maintenance windows, potential impacts, and completion updates. Link patch approvals to your IT Service Management (ITSM) system to create an audit trail and ensure every change is documented.
Define Maintenance Windows
Schedule maintenance windows to minimize business disruptions when applying patches. Use cron syntax (e.g., cron(0 2 ? * SAT#3 *)) for precise and consistent scheduling. Each window should include a duration (total time allotted) and a cutoff (the stop point for initiating new tasks) to prevent overruns into business hours.
Organize servers into groups, such as "Patch Group" and "Maintenance Window", to control deployment timing. For example, all servers in the App-Prod-Win group should share the same window to ensure consistency. Prioritize internet-facing servers for earlier updates, while internal servers like backups can follow later.
Use a staged deployment strategy to reduce risk. Start with development environments, then move to testing, and finally to production after successful validation. Rate controls, such as patching two servers or 10% of your fleet at a time, can further limit the impact of any issues.
Set Risk-Based Priorities
Not all patches demand the same urgency. Use factors like vulnerability severity (CVSS scores), asset exposure (internet-facing vs. internal), and business impact (production vs. development) to prioritize. For example, a public-facing server with a CVSS 8.8 vulnerability and an active exploit should take precedence over an internal sandbox server with a low-severity issue.
Automate policies for critical and high-severity vulnerabilities using CVE data. In production environments, consider a "patch age" policy – waiting 7–14 days after a patch release to ensure stability before deployment. This approach balances the need for quick action with the importance of avoiding untested updates.
Maintain a risk register for systems that can’t be patched, documenting compensating controls and verifying them during each maintenance window. If you’re managing infrastructure on platforms like Serverion dedicated servers or VPS, integrate these systems into your centralized policy framework to ensure consistent prioritization across your network.
Once your policy is defined, the next step is to select and configure automation tools that enforce these priorities effectively.
Step 3: Select and Configure Automation Tools
Once you’ve established a clear patch management policy, the next step is to choose automation tools that align with your specific needs. Your selection should consider factors like your operating system mix, the scale of your environment, and your desired level of control.
Evaluate Automation Tool Options
Here’s a breakdown of some popular automation tools and their strengths and limitations:
Windows Server Update Services (WSUS)
WSUS is included with Windows Server and provides a centralized console for managing Microsoft patches. It’s a solid choice for small to mid-sized Windows environments, but it becomes unwieldy at larger scales and is limited to Microsoft products.
System Center Configuration Manager (SCCM)
Now called Microsoft Endpoint Configuration Manager, SCCM offers detailed control over large Windows deployments. However, it requires a significant investment in both licensing fees and administrative resources.
Ansible Automation Platform
Ansible uses a "patching as code" approach and doesn’t require agents, as it relies on SSH for Linux and WinRM for Windows. While it’s powerful and integrates well with cloud environments, it does require your team to be proficient in writing YAML playbooks.
AWS Systems Manager Patch Manager
This tool is ideal for cloud-native environments, integrating seamlessly with EC2 instances and hybrid servers. You can define patch baselines with rules such as automatically approving security patches after seven days. However, it can be challenging to implement in hybrid or on-premises setups.
Managed Services
Providers like Serverion offer 24/7 monitoring and remediation, ensuring patches are applied consistently, even if your internal resources are limited. According to the 2025 Verizon Data Breach Investigations Report, 20% of breaches stemmed from known vulnerabilities, and 60% of breached companies were aware of their unpatched systems.
| Tool Type | Primary OS | Key Strengths | Limitations |
|---|---|---|---|
| WSUS | Windows | Free with Windows Server; reduces bandwidth usage | Limited to Microsoft products; challenging at scale |
| SCCM | Windows | Detailed control; great for large deployments | High cost; requires significant admin effort |
| Ansible | Cross-platform | Agentless; integrates with cloud | Requires YAML scripting skills |
| Managed Services | Multi-OS | 24/7 monitoring; reduces internal workload | Higher ongoing costs; less direct control |
| AWS Patch Manager | Multi-OS | Cloud integration; customizable baselines | Complex for hybrid/on-prem environments |
Configure Your Selected Tool
Once you’ve chosen a tool, proper configuration is essential to ensure it functions effectively. Here’s how to get started with some of the most popular options:
WSUS
Set up WSUS on a Windows Server and configure update classifications (e.g., Critical, Security, Definition Updates). Use Group Policy Objects (GPOs) to direct client servers to your internal WSUS server URL. Enable client-side targeting to automatically organize servers into groups based on their Active Directory Organizational Unit (OU).
"WSUS allows centralized management of updates, ensuring that all servers and workstations receive the necessary patches while reducing bandwidth usage." – Ashwani Paliwal, SecOps Solution
Ansible
Begin by creating a centralized inventory using dynamic plugins that connect to your infrastructure providers, such as AWS, Azure, or VMware. Use the keyed_groups directive to automatically group servers by operating system, environment tags, or function. Build job templates to trigger playbooks during maintenance windows. For Linux, use modules like ansible.builtin.dnf or ansible.builtin.apt to handle updates, ensuring critical services are paused and restarted as needed. For Windows, the win_updates module can manage reboots and filter updates by category.
"By using Red Hat Ansible Automation Platform for automated patch management of both RHEL and Windows in a single workstream, you can ensure even more consistency and operational efficiency." – Tricia McConnell, Red Hat
AWS Patch Manager
Leverage patch baselines to define approval rules, such as delaying the approval of critical updates for seven days to monitor community feedback. This approach is particularly useful for updates released on Microsoft’s Patch Tuesday. Ensure all instances have the SSM Agent (v2.0.834.0+) installed.
Managed Services
If you’re using managed services like Serverion, collaborate with your provider to define workflows and escalation procedures that align with your patch management strategy. For example, schedule regular maintenance tasks, such as running the WSUS Server Cleanup Wizard to remove outdated updates or auditing Ansible playbooks to prevent configuration drift.
sbb-itb-59e1987
Step 4: Test Patches in Isolated Environments
Testing patches in a controlled environment is crucial to avoid unexpected outages or disruptions. Even minor updates can lead to conflicts, performance issues, or broken dependencies. By testing in isolated setups, you can catch these problems before they affect your live environment.
"Server Patch Management must include rigorous testing to detect regressions and prevent outages." – Jack Williams, WordPress and Server Management Specialist, Moss.sh
This phase ensures your automation scripts work as intended and helps establish performance benchmarks, especially for high-impact updates like kernel or database patches. Critical updates typically require 24–72 hours of testing, while non-critical ones can follow a 30-day review cycle. A test environment that closely mirrors your production setup is essential for accurate results.
Set Up a Test Environment
Your test environment must be an exact replica of your production setup. This includes matching OS versions, package configurations, network settings, and open ports. Tools like Infrastructure-as-Code can help replicate your production environment efficiently.
Before applying any patches, create snapshots of your virtual machines or back up your filesystems. These backups provide a safety net in case something goes wrong. If you’re using tools like Puppet, create specific node groups for testing to prevent accidental overlap with production systems.
To avoid interference during testing, configure antivirus exclusions for patch management directories. For Windows servers, this might include paths like C:\ProgramData\SolarWinds\ or similar directories used by your automation tools. Additionally, schedule blackout windows to prevent automated production tasks from disrupting the testing process.
Validate Patch Compatibility
Once your test environment is ready, begin validating patch compatibility and performance through structured testing steps. Start with unit or smoke tests to confirm basic server functionality, such as booting and core service startup. Follow this with functional User Acceptance Testing (UAT) to ensure critical workflows – like database connectivity, authentication, and web application health – are functioning correctly. Progress to a pre-production environment that fully mirrors your production setup and, finally, deploy to a production canary – a small group of live servers that minimizes risks if issues arise.
| Testing Phase | Objective | Key Activities |
|---|---|---|
| Unit/Smoke Tests | Basic Stability | Verify server boot and core service startup |
| Functional UAT | Application Integrity | Test web app health, DB connectivity, and auth flows |
| Pre-Production | Environment Mirroring | Test patches on a full replica of production |
| Production Canary | Limited Rollout | Deploy to a small subset of production servers |
Automate your validation processes to run immediately after applying patches. These scripts should verify service health endpoints, check API responses, and ensure all interconnected services are functioning properly. For kernel or database updates, run I/O and latency benchmarks to identify any hidden performance issues.
"Automation can introduce regressions if not guarded. Prevent issues by implementing staged pipelines (canaries), automated smoke tests, dependency checks, and rollback procedures." – Jack Williams, Moss.sh
Document your results in a patch acceptance matrix – a centralized knowledge base that tracks tested OS builds, application stacks, and any incompatibilities discovered. This resource will guide future deployments, helping teams quickly determine which patches are safe to apply and which require further testing. With an efficient testing process, advanced tools can reduce patch deployment times to as little as 4 hours while maintaining system stability.
Step 5: Automate Deployment and Prepare Rollback Plans
Once testing is complete, the focus shifts to deploying patches safely and efficiently, while also preparing for potential rollbacks in case something goes wrong.
Automating deployment is key to minimizing errors and maintaining system stability. Aim to address critical CVEs within 48 hours and non-critical ones within 30 days. These timelines are achievable with well-designed automated scripts that include safeguards. Without such measures, a single failed patch could disrupt your entire infrastructure.
"A proactive patch program balances speed and stability, reducing the window between vulnerability discovery and remediation while avoiding downtime caused by untested updates." – Moss.sh
Automate Deployment Scripts
Begin with staged rollouts, deploying patches in phases rather than all at once. Start with a small canary group, monitor it for 24 hours, and then proceed to the rest of the system. This approach minimizes the impact of any issues, keeping the "blast radius" manageable. Set limits on how many servers update simultaneously (e.g., 10% at a time) and define error thresholds to automatically halt the process if too many failures occur.
Schedule updates during maintenance windows when traffic is low. Use tools like cron expressions or rate-based scheduling to ensure minimal disruption. For high-availability clusters, patch servers one at a time to maintain uptime. Additionally, avoid automated patching during critical business periods, such as end-of-year processing, by establishing blackout windows.
Incorporate lifecycle hooks to gracefully stop critical services before patching and implement smart reboot logic. This ensures systems reboot only when necessary, avoiding unnecessary downtime. For example, tools like Ansible can manage patching with modules such as ansible.builtin.dnf for Linux or win-updates for Windows.
| Reboot Strategy | Description | Best Use Case |
|---|---|---|
| Smart | Reboots only if the OS signals a restart is needed | Reduces downtime and improves efficiency |
| Patched | Reboots only after successful patch application | Standard for most automated workflows |
| Always | Forces a reboot regardless of patch status | Ideal for kernel updates requiring a clean state |
| Never | Prevents reboots; requires manual intervention | Suitable for legacy systems needing manual oversight |
Once deployment safeguards are in place, shift your attention to creating reliable rollback plans to quickly address any issues that arise.
Implement Rollback Procedures
Automated snapshots should be part of every deployment script. For virtual machines, create VM-level snapshots. On Linux systems, use Logical Volume Manager (LVM) snapshots for quick local recovery. These backups allow you to restore systems to a stable state if a patch introduces unexpected problems.
Add block-rescue logic to your scripts, triggering recovery actions automatically when a patch fails. For example, you can design templates for "Restore patch backup" jobs that revert changes and reload previous configurations when validation checks fail.
"Include rollback plans: snapshot VMs, create filesystem backups, or use blue/green and canary deployment patterns to limit blast radius." – Moss.sh
After deploying patches, run automated validation checks to ensure everything is functioning correctly. These checks should verify service health, test API responses, and confirm database connectivity. If any issues are detected, your scripts should initiate the rollback process automatically. For environments using immutable infrastructure, rollback means terminating problematic instances and redeploying the previous Amazon Machine Image (AMI) or container version. Keep pre-approved emergency change procedures in place for quick action during zero-day vulnerabilities.
Step 6: Monitor and Review Patch Processes
Applying patches is just the beginning. Ongoing monitoring ensures your automation runs smoothly and helps you catch issues before they spiral out of control. Keep an eye on key metrics like patch coverage (how much of your system is up-to-date), time-to-patch (the speed of addressing critical vulnerabilities), and patch failure rates. These metrics help you assess if your automation is achieving its security goals or if it’s introducing risks, like configuration drift. Consistent oversight ensures that automated deployments lead to long-term system stability.
Set Up Real-Time Monitoring and Alerts
Use CLI or API commands to continuously track patch statuses and trigger health checks when needed. For instance, commands like describe-patch-group-state can provide real-time data on managed nodes, showing whether patches are installed, missing, or have failed. Display this information on dashboards for a quick overview of your entire system.
Set error thresholds that pause deployments and immediately notify your team via email or chat when patch failures exceed acceptable limits. To centralize alerts, integrate your patch management tools with platforms like AWS Security Hub or CloudWatch. Additionally, define blackout periods – such as during end-of-year processing or major launches – to avoid unnecessary alerts and minimize risks during critical times.
Generate and Analyze Reports
Real-time alerts are essential, but scheduled reports provide a broader view of compliance and performance. Regularly export automated patch compliance reports in CSV format to storage systems like Amazon S3. Weekly reports are useful for routine checks, while more frequent reporting may be necessary during high-risk periods. Include metrics such as patch coverage, time-to-patch for critical vulnerabilities, failure rates, and systems awaiting reboots.
"Server Patch Management programs require measurable indicators to prove effectiveness." – Jack Williams, Specialist, Moss.sh
Track both raw numbers and percentages as your infrastructure grows. For example, patching 1,200 servers sounds impressive, but if that’s only 60% of your fleet, there’s still a significant gap. Calculate the update effectiveness (installed vs. required updates) to measure per-system compliance.
Use these reports to dig into root causes of failed deployments. If certain packages repeatedly fail on specific OS versions, refine your testing and compatibility checks. Review incidents related to changes, rollback rates, and the time it takes to recover from failures to pinpoint inefficiencies. For compliance frameworks like PCI DSS or HIPAA, ensure you can export proof of patch deployments, test results, and approved exceptions into tamper-proof logs for audits.
Conclusion
Automating patch management is a game-changer for server security. By following the six steps outlined in this guide – assessing your inventory, creating a policy, configuring automation tools, testing in sandboxes, deploying with rollback plans, and monitoring continuously – you can address vulnerabilities quickly and effectively. This approach not only protects critical data from exploits and zero-day attacks but also helps maintain uptime and system stability.
But the benefits go beyond just security. Automation reduces repetitive tasks for IT teams, giving them the freedom to focus on strategic projects. It also ensures consistency across various environments, whether you’re managing on-premise, cloud, or hybrid infrastructures, while significantly lowering the risk of human error. With global information security spending expected to hit $212 billion in 2025 (a 15.1% jump from 2024), organizations that embrace automated patch management position themselves ahead of the curve.
"Server patch management is not a one-off project but an operational capability that combines policy, automation, testing, monitoring, and human processes." – Jack Williams, WordPress and Server Management Specialist, Moss.sh
For businesses without dedicated security teams, expert-managed services can make automation even simpler. Take Serverion, for example. Their managed hosting services streamline every aspect of the patching process – from identifying vulnerabilities to testing and deployment – while offering continuous monitoring, routine backups, and DDoS protection. With 37 datacenter locations worldwide, they ensure low-latency patch delivery no matter where your servers are located.
The bottom line? Start with a clear patch management policy, test thoroughly, and monitor consistently. Whether you handle it in-house or partner with a provider like Serverion, the goal is the same: stop vulnerabilities in their tracks while keeping your systems running smoothly.
FAQs
What are the benefits of automating server patch management?
Automating patch management for servers brings a host of benefits that keep IT operations secure and running smoothly. With automation, vulnerabilities are addressed swiftly, lowering the risk of cyberattacks and helping businesses meet regulatory requirements like PCI-DSS and HIPAA. It also ensures updates happen during planned maintenance windows, minimizing downtime and avoiding expensive disruptions.
Another advantage? It removes the risk of human error, guaranteeing updates are applied consistently and on time across all servers. IT teams can reclaim valuable time and energy, focusing on more critical tasks instead of manual patching. Plus, automation scales effortlessly, whether you’re managing a few servers or a sprawling infrastructure across on-premises systems or the cloud. These perks align perfectly with Serverion’s server management solutions, helping U.S. businesses secure and optimize their IT environments with ease.
What steps can I take to ensure my automated patch management process is secure and reliable?
To build a secure and reliable automated patch management process, start by establishing a clear patch policy. This should include schedules for both critical and routine updates. Before rolling out patches to production systems, always test them in a controlled environment to avoid unexpected disruptions.
Choose trusted automation tools that offer role-based access control and use encrypted communication to protect the process from potential threats. Position your automation servers close to the systems they manage – this reduces latency and limits security risks.
Once patches are deployed, verify that they were applied successfully. Keep detailed audit logs to help with compliance requirements and troubleshooting. Make it a habit to regularly update your automation tools and stay vigilant for emerging vulnerabilities to ensure your systems remain secure and up to date. These practices will help you maintain a smooth and secure patch management workflow.
What factors should I consider when choosing a tool to automate patch management for servers?
When choosing a tool to automate patch management for servers, it’s important to focus on a few key aspects. Start by ensuring the tool is compatible with your operating systems – whether you’re running Windows Server, Linux distributions, or both – and any third-party software critical to your operations. Features like customizable policies, flexible scheduling, and integration with monitoring and notification systems can make the entire process much smoother and more efficient.
If you’re managing a large number of servers or servers spread across different locations, scalability becomes a top priority. Additionally, robust reporting and compliance tracking are essential, especially if you need to meet security standards like PCI DSS or HIPAA. A tool with strong reporting capabilities can help you stay on top of these requirements.
Finally, a user-friendly interface or management console can make a huge difference. It simplifies both the initial setup and the ongoing maintenance of your patch management process. By keeping these factors in mind, you’ll be better equipped to select a solution that ensures your servers remain secure and well-maintained.


