
Access Control for Encryption Keys: Best Practices
Protecting encryption keys is just as important as encrypting your data. Poor key access control can lead to data breaches, service impersonation, and permanent data loss. Here’s what you need to know to keep your keys secure:
- Principle of Least Privilege: Only grant the minimum permissions needed for specific tasks. Avoid overly broad permissions like
kms:*and enforce strict access policies. - Role-Based Access Control (RBAC): Separate roles for key management (e.g., administrators) and cryptographic operations (e.g., users). Avoid overlapping responsibilities.
- Centralized Key Management: Use tools like AWS KMS, Google Cloud KMS, or Azure Key Vault for consistent and secure key handling.
- Hardware Security Modules (HSMs): Store keys in tamper-resistant hardware for stronger protection. Managed HSMs simplify integration and provide FIPS compliance.
- Monitoring and Logging: Enable detailed logs for both admin activities and key usage. Set up alerts for unusual behaviors or high-risk actions.
- Key Rotation and Revocation: Rotate keys regularly to limit exposure. Revoke compromised keys immediately and replace them without delay.
Following these steps ensures your encryption keys remain secure, reducing risks and maintaining data integrity.
PKI 101: private encryption key storage and use
sbb-itb-59e1987
Applying Least Privilege to Key Management
Key Administrator vs Key User Roles and Permissions
What Least Privilege Means
The Principle of Least Privilege (PoLP) focuses on giving users and services only the permissions they absolutely need to perform their tasks – nothing more. When applied to key management, this means carefully controlling who can encrypt, decrypt, modify policies, or delete keys.
"No AWS principal has any permissions to a KMS key unless that permission is provided explicitly and never denied. There are no implicit or automatic permissions to use or manage a KMS key." – AWS Key Management Service
This "deny by default" approach is a cornerstone of security. Even the account owner or the person who creates a key doesn’t automatically have permissions – they must be explicitly granted. This strict control significantly reduces potential vulnerabilities. If a credential is compromised, the damage is limited to the specific permissions assigned to that identity. For instance, a compromised "Key User" credential won’t allow key deletion if administrative rights weren’t granted.
Failing to enforce least privilege can lead to serious consequences. Without proper restrictions, attackers could escalate their privileges by altering key policies to give themselves full control. Even worse, they could schedule key deletion, which permanently destroys the encrypted data. AWS enforces a waiting period of at least 7 days (and up to 30 days) for key deletion because once a key is deleted, any data encrypted with it is gone forever.
To implement these controls effectively, Role-Based Access Control (RBAC) becomes a critical tool.
Setting Up Role-Based Access Control (RBAC)
RBAC simplifies least privilege by assigning permissions based on job roles instead of individuals. Rather than managing permissions user-by-user, you define roles like "Key Administrator" and "Key User" and assign people to these roles based on their responsibilities.
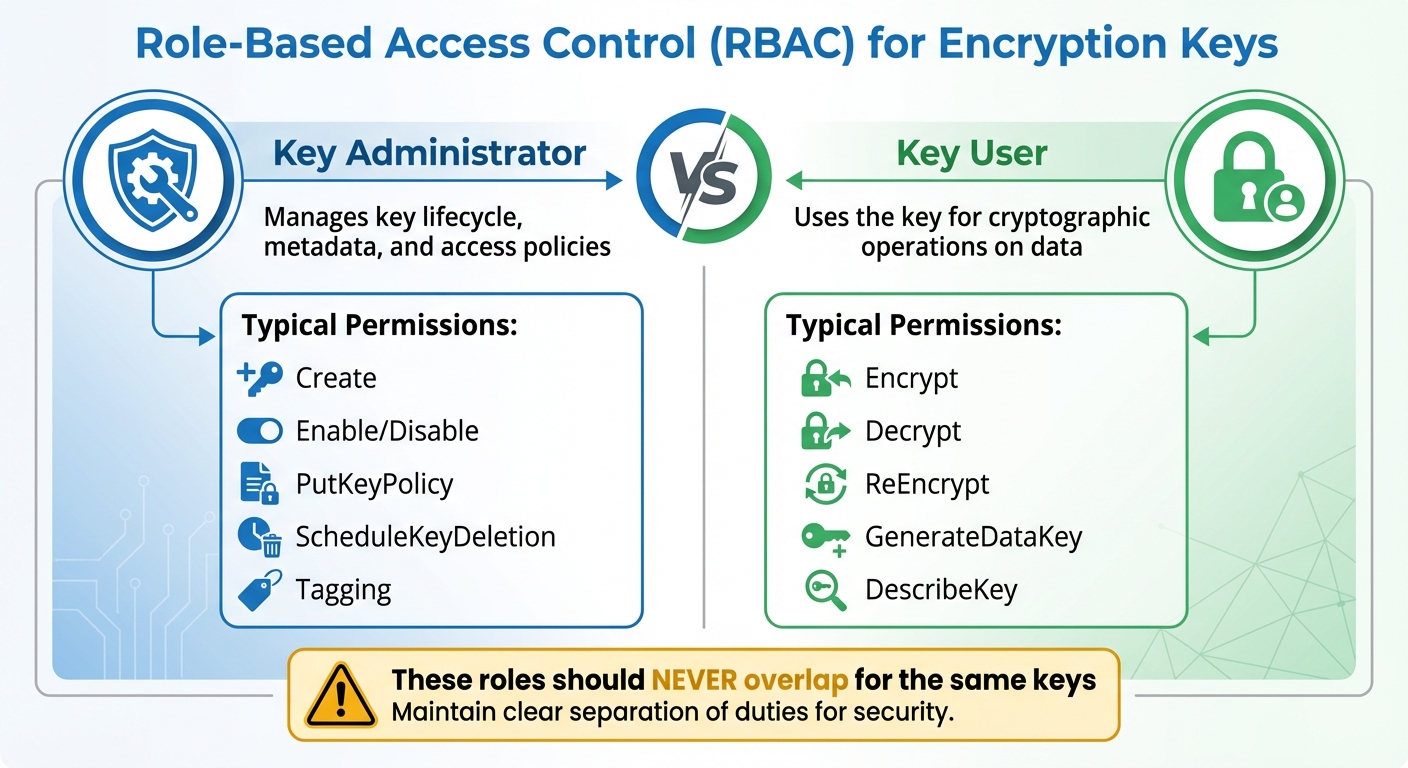
A key principle of RBAC is separating administrative tasks from cryptographic operations. Key Administrators handle the lifecycle of keys – creating, enabling or disabling, updating policies, and scheduling deletion. Key Users, on the other hand, perform encryption and decryption. These roles should never overlap for the same keys.
| Role Type | Typical Permissions | Purpose |
|---|---|---|
| Key Administrator | Create, Enable/Disable, PutKeyPolicy, ScheduleKeyDeletion, Tagging | Manages key lifecycle, metadata, and access policies |
| Key User | Encrypt, Decrypt, ReEncrypt, GenerateDataKey, DescribeKey | Uses the key for cryptographic operations on data |
When configuring RBAC, avoid using wildcard permissions like kms:* in your policies. Always specify the exact key ARN or resource ID. Wildcards can unintentionally grant access to keys in other accounts or regions. Additionally, use separate keys for different data types – customer data, financial records, and internal communications should each have their own key. This ensures that if one credential is compromised, only a specific subset of data is at risk.
For added protection, require Multi-Factor Authentication (MFA) for sensitive actions like scheduling key deletion or changing key policies. Another useful layer is encryption context, which ties permissions to specific metadata. These non-secret key-value pairs ensure that a key can only decrypt data if the same context used during encryption is provided, adding an extra safeguard against unauthorized use – even if the key itself is compromised.
Centralized Key Access Management
Benefits of Centralized Management
Centralized key management builds on the principles of least privilege and defined roles, helping organizations enforce consistent security practices. By managing encryption keys from a single account or project, businesses can avoid the hassle of juggling keys across multiple environments. Instead of dealing with separate accounts for key lifecycles, administrators can rely on a unified console. This becomes especially important as organizations grow, where managing a large number of keys demands a streamlined approach.
"The ability to group keys, group end points, and assign roles and policies to those groups using a unified management console are the only ways to manage what may amount to millions of keys and operations." – Nisha Amthul, Senior Product Marketing Manager, Thales
Centralized systems also reduce the chances of misconfigurations by enforcing consistent security measures. They lower risks like accidental deletion of keys or privilege escalation, as local administrators are not given unchecked authority over critical keys.
"This centralized model can help minimize the risk of unintended deletion of keys or privilege escalation by delegated administrators or users." – AWS Prescriptive Guidance
Another significant advantage is the separation of administrative tasks from data access. This not only strengthens compliance but also simplifies audits by creating a clear division of responsibilities. Centralized logging further enhances this by consolidating all key access events into one audit trail, making it easier to monitor and review activity.
With these advantages in mind, choosing the right centralized key management tool becomes a vital step in ensuring efficient and secure key lifecycle management.
Tools for Centralized Key Management
Several tools are available to streamline centralized key management:
- AWS Key Management Service (KMS): Protects root keys using FIPS 140-2 or 140-3 Level 3 validated Hardware Security Modules (HSMs) and integrates seamlessly with other AWS services for unified auditing.
- Google Cloud KMS: Offers Customer-Managed Encryption Keys with options for software, HSM, and External Key Manager protection levels.
- Azure Key Vault: Centralizes the storage of keys, secrets, and certificates while incorporating built-in role-based access controls.
For organizations operating in multi-cloud environments, additional tools can provide a unified interface:
- HashiCorp Vault’s Key Management Secrets Engine: Delivers a consistent workflow for managing keys across AWS KMS, Azure Key Vault, and Google Cloud KMS from one interface.
- Thales CipherTrust Manager: Oversees key lifecycles across servers, storage systems, and cloud platforms via a single console.
When selecting a tool, prioritize those that support detailed access controls to reinforce the least privilege principle. Automation capabilities are another key consideration. While organizations with strong automation systems may handle decentralized setups, centralized management is often better suited for manual processes. Evaluate your specific needs, such as compliance requirements (e.g., FIPS 140-3 Level 3 validation), lifecycle control, and service quotas per account, to make the best choice for your organization.
Key Policies and Separation of Duties
Creating and Enforcing Key Policies
Key policies should address every phase of a key’s lifecycle – from its creation to its eventual destruction. Without clear documentation, there’s a higher risk of keys being misused.
Your policy needs to assign specific roles with well-defined responsibilities. For instance, Cryptographic Officers might handle tasks like key generation and backups, while Security Auditors focus on ensuring compliance. This clear division eliminates ambiguity and ensures accountability. Keep an up-to-date inventory for each key, detailing its creation date, encryption algorithm (such as 3072-bit RSA), approved uses, and ownership.
Use a combination of resource-based and identity-based policies to control access. Resource-based policies tie permissions to specific keys, while identity-based policies govern user and role actions. To reinforce a "deny by default" approach, specify exact ARNs and limit sensitive permissions. For example, restrict the kms:ScheduleKeyDeletion permission to trusted principals, ensuring a minimum waiting period for deletion. AWS KMS enforces a default waiting period of 7 days (extendable up to 30 days) before permanently deleting a key, reducing the risk of accidental data loss.
"No AWS principal, including the account root user or key creator, has any permissions to a KMS key unless they are explicitly allowed and not explicitly denied in a key policy, IAM policy, or grant." – AWS Prescriptive Guidance
Separating Key Management Responsibilities
Once you’ve established robust key policies, the next step is to ensure duties are divided to minimize risks. By separating key administration from cryptographic operations, you reduce the likelihood of a single individual compromising key security. For example, the person managing a key should never have access to the data it protects. This division not only lowers the risk of fraud or errors but also prevents privilege escalation.
Clearly define roles such as Key Administrators, who oversee key lifecycles, creation, and rotation, and Key Users, who handle encryption, decryption, and signing operations. Avoid assigning broad roles like "Owner" or "Editor" that combine administrative and operational tasks. Instead, stick to narrowly defined roles that follow the principle of least privilege.
For high-stakes operations, implement multi-party authorization techniques, such as Shamir’s Secret Sharing, to ensure no single person can compromise a key. Require Multi-Factor Authentication (MFA) for sensitive actions, and distribute passwords and MFA devices among multiple individuals to further enhance security.
I try to treat passwords as the “first door” to encryption keys: if that door is weak, every other security layer becomes mostly decorative. So I keep it simple and strict: one account = one unique, long password, with no reuse and no “slight variations” like Password123! → Password124!. I don’t store these passwords in notes or send them in chats; instead, I rely on a password manager and enable MFA everywhere it’s available. And when access to critical systems has to be shared, I avoid “one common password for everyone” and push for separate accounts and role-based permissions, because it’s clearer who did what, and it’s much easier to revoke access quickly if something goes wrong.
The 2011 RSA breach is a cautionary tale. In that incident, insufficient separation of key management duties allowed attackers to clone two-factor authentication tokens, illustrating the dangers of lax role division.
Automating monitoring is another critical step. Use tools to detect and flag any overlap in permissions that could indicate a violation of duty separation. Service account insights can also identify accounts that have been unused for 90 days or more, signaling they should be disabled or removed to reduce unnecessary access and limit the number of active keys.
Using Hardware Security Modules (HSMs) for Key Protection
Understanding Hardware Security Modules
A Hardware Security Module (HSM) is a specialized device designed to safeguard encryption keys within a secure, tamper-resistant environment. Unlike software-based solutions, HSMs rely on dedicated cryptoprocessor chips encased in tamper-evident packaging. This setup ensures that encryption keys are both generated and stored entirely within the hardware boundary, never leaving it in plaintext.
Advanced HSMs include tamper-responsive mechanisms that can instantly zeroize (permanently erase) sensitive key material if a physical breach is detected. Most HSMs meet FIPS 140-2 or 140-3 Level 3 certification standards, offering hardware-based isolation far superior to software-only methods.
Today, cloud providers simplify access to this technology through Managed HSMs. These services deliver FIPS-compliant hardware security without requiring physical devices. Managed HSMs typically ensure 99.99% availability by replicating data across multiple regions. Access is divided into two planes: the Control Plane, which handles resource management (e.g., creating, deleting, configuring), and the Data Plane, which manages cryptographic operations like encryption, decryption, and signing. This separation ensures administrative tasks are distinct from direct access to sensitive keys.
By integrating HSMs into your systems, you can establish stronger access controls and secure key operations effectively.
Integrating HSMs with Your Systems
Integrating HSMs into your infrastructure enhances key security by keeping sensitive material within a protected hardware boundary. The first step is setting up robust access controls for both the Control and Data Planes. Use managed identities for applications to authenticate with the HSM, eliminating the need to store credentials in your code or configuration files. Assign roles carefully – cloud-level roles like "Key Vault Contributor" manage the HSM itself, while HSM-local roles such as "Crypto Officer" or "Crypto User" handle cryptographic tasks. Limit permissions to specific keys (e.g., /keys/<key-name>) rather than granting access to the entire HSM.
For added security, establish a Security Domain quorum using at least three RSA key pairs, each managed by a different administrator. This setup ensures no single person can fully recover or compromise the HSM. Keep these recovery keys on encrypted, offline USB drives stored in separate safes. Enable features like soft-delete (with retention periods from 7 to 90 days) and purge protection to guard against accidental or malicious deletion of keys.
To secure network communication, disable public internet access and route all HSM traffic through private endpoints. For highly regulated environments, consider a "Hold Your Own Key" (HYOK) approach. This model keeps keys in an external HSM, never exposing them to the cloud provider’s infrastructure. It also uses double encryption: data is encrypted first by the cloud provider and then again by your external HSM, ensuring neither party can access plaintext independently.
Enhance security further by using Just-in-Time access through Privileged Identity Management, which grants temporary administrative rights only when needed. Mark keys as "non-exportable" to ensure they remain within the hardware boundary and implement automated key rotation schedules to minimize the risk of compromise over time.
Monitoring, Auditing, and Logging Key Access
After implementing strong key management and hardware security practices, keeping a close eye on access through monitoring and logging is essential to catch potential breaches early.
Setting Up Access Monitoring
Tracking key access is critical for spotting unauthorized use before it becomes a problem. Start by differentiating between Admin Activity logs (which record actions like creating keys or updating policies) and Data Access logs (which track cryptographic operations such as encryption and decryption). While Data Access logs are often turned off by default due to the sheer volume they generate, enabling them for your most sensitive keys is a smart move.
Establish a baseline of typical usage for both data and control plane activities. This makes it easier to detect unusual behavior, like a surge in decryption requests at an odd hour or an administrator accessing keys they’ve never used before. Send audit logs to automated monitoring tools like CloudWatch Alarms to trigger alerts for high-risk events, such as ScheduleKeyDeletion, DisableKey, or unauthorized policy changes.
Take advantage of Encryption Context key-value pairs, which are visible in plaintext within logs, to categorize activities without exposing sensitive data. Pay close attention to tag changes, as unauthorized TagResource or UntagResource actions can escalate privileges. Keep in mind that changes to tags or aliases might take up to 5 minutes to impact KMS key permissions, so your monitoring setup should account for this delay.
Effective access monitoring naturally feeds into creating detailed audit trails for complete visibility.
Creating Audit Trails and Logs
To complement monitoring, ensure you have a thorough logging system to create a secure audit trail. This approach helps maintain accountability and prepares you for forensic investigations. Use at least two types of audit devices for redundancy. Tools like HashiCorp Vault are designed to block API requests if they can’t log to at least one device, preventing untracked access.
Forward logs to a remote system to protect them from tampering and ensure they’re available for compliance audits. For added security, use keyed hashes (e.g., HMAC-SHA256) to safeguard sensitive log data while keeping it auditable. Set up alerts for critical events, such as root token usage, changes to audit configurations, or a spike in "permission denied" errors. Don’t forget to implement log rotation (e.g., using logrotate) and configure HUP signals to ensure uninterrupted logging.
Centralize and aggregate logs from all projects or accounts into a single repository for organization-wide visibility. This not only simplifies oversight but also supports compliance with standards like PCI DSS, FedRAMP, and HIPAA. Be mindful, though – enabling Data Access logs can increase costs due to the larger data volume.
Key Rotation and Revocation Practices
Encryption keys aren’t meant to last forever. Regular rotation and timely revocation are essential to prevent outdated or compromised keys from putting sensitive data at risk.
When and Why to Rotate Keys
Rotating encryption keys helps limit the damage a single compromised key can cause. Instead of one key protecting data for years, rotation ensures each key is only valid for a specific time frame. For instance, PCI DSS mandates annual key rotation at a minimum, but for highly sensitive data like cardholder information, rotating keys quarterly is a safer bet. For service account keys, experts recommend rotating them at least every 90 days to minimize risks from leaked credentials.
The rotation frequency should depend on the data’s sensitivity and how often the key is used. For example, NIST advises rotating AES-256-GCM keys before they reach around 4.3 billion encryptions. Similarly, Azure Key Vault suggests rotating encryption keys at least every two years. High-use keys face greater cryptanalytic risks, so tracking the number of encryptions through telemetry can help determine when rotation is due, rather than relying solely on a calendar schedule.
To make this process smoother and error-free, automation tools like HashiCorp Vault or Cloud KMS can handle key rotation for you. These tools use key versioning, where new data is encrypted with the latest key while older keys decrypt historical data. This allows for a gradual, "lazy" re-encryption process, updating data as it is accessed.
But rotation alone isn’t always enough. When a breach occurs, revoking the key becomes the next critical step.
Revoking Keys to Reduce Risks
Key revocation is a rapid-response measure for when a key is compromised, an employee with access leaves, or another security event occurs. Timing is everything – revocation should ideally happen within 24 hours of identifying the issue.
Here’s how it works: First, identify the compromised key and generate a secure replacement. Deploy the new key across all systems, then disable the old one. However, don’t delete it immediately – this grace period allows you to monitor for any errors or dependencies still tied to the disabled key. Once you’ve confirmed that no critical systems are affected, update configurations, re-encrypt necessary data, and permanently delete the old key.
"Failing to revoke compromised keys promptly enables continued unauthorized decryption. Poor key management practices render encryption useless, leaving data exposed." – SSL Support Team, SSL.com
A stark example of the consequences of poor key management is the 2011 RSA Security breach. Attackers stole cryptographic "seed" values for millions of SecurID tokens because RSA failed to secure the seed database and enforce proper access controls. This breach highlights the importance of prompt and effective key management practices to protect sensitive data.
Conclusion
Strong key access control is essential for safeguarding sensitive data. By applying the principle of least privilege, separating duties, and using hardware-based protection like FIPS 140-2 Level 3 validated HSMs, you create a solid foundation for secure key management. These strategies are critical for preventing both accidental data exposure and intentional breaches.
"No AWS principal, including the account root user or key creator, has any permissions to a KMS key unless they are explicitly allowed and not explicitly denied in a key policy, IAM policy, or grant." – AWS Prescriptive Guidance
Additional measures, such as enforced waiting periods and multi-factor authentication, provide further protection. Multi-factor authentication, in particular, adds an extra layer of security by restricting unauthorized key changes. Automated key rotation, typically set to occur every 90 days, also minimizes the risk by reducing the potential damage a compromised key can cause.
Effective key management demands constant attention. As organizations grow, staff transitions occur, and new risks arise, access controls must evolve. Regular audits are crucial for identifying over-privileged roles, while real-time monitoring is key to spotting unusual access activity before it becomes a threat. Features like automated provisioning, real-time alerts, and encryption context work together to keep your keys secure throughout their entire lifecycle.
FAQs
What’s the safest way to split Key Admin and Key User access?
To ensure security, it’s best to follow the principle of separation of duties. This means dividing responsibilities so that no single individual can handle both administrative and operational tasks. For example, designate Key Admins to oversee key creation and policy management, while Key Users focus on cryptographic tasks like encryption and decryption. Implement role-based access control (RBAC) along with detailed IAM policies to enforce these boundaries. Additionally, maintain comprehensive audit logs to track activities and quickly identify any unauthorized actions.
When should I use an HSM instead of software key storage?
A hardware security module (HSM) is the go-to solution when hardware-based isolation and tamper resistance are non-negotiable for protecting highly sensitive cryptographic keys. HSMs excel in scenarios where meeting strict compliance standards is critical or where the risks from breaches and software vulnerabilities need to be minimized.
Unlike software-based key storage, HSMs provide an added layer of security, making them the preferred choice for environments demanding the highest levels of protection.
How can I rotate keys without breaking apps or losing access to data?
To switch encryption keys without interrupting applications or losing access to data, here’s what to do:
- Plan and schedule rotations: Set up automated systems or schedule key generation as needed to create new encryption keys.
- Update applications and data: Transition to the new keys step by step, keeping the old keys active temporarily to maintain compatibility.
- Monitor and verify: Test thoroughly to confirm that applications work smoothly with the updated keys.
This method helps maintain security while avoiding disruptions.


